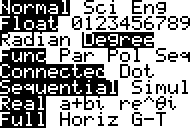
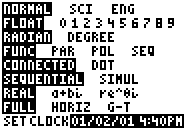
The TI-83 Plus and TI-84 Plus offer a variety of different settings for customizing calculations and the way graphs are displayed. While some of these options are more aesthetic, like setting the graph to be displayed in a split screen or numbers to be displayed with two decimals for doing calculations with money, not having some settings configured correctly can lead to making errors in your calculations. This tutorial explains the various display mode settings available on the TI-83 Plus and TI-84 Plus, which can be reached by pressing .


Settings Menus on the TI-83 Plus and TI-84 Plus, respectively
You can select various settings by using the arrow buttons. To choose a selected option, press .
NORMAL / SCI / ENG
NORMAL is the default setting and displays numbers as decimals until they are at least eleven digits long, at which point it reverts to scientific notation.
SCI displays all numbers in scientific notation, e.g. 1.0057E4
ENG displays numbers in scientific notation with powers of 1000 instead of powers of 10, which means that 10 would be displayed as 10E0, whereas 10000 would be displayed as 10E3.
FLOAT / 0 / 1 / 2 / 3 / 4 / 5 / 6 / 7 / 8 / 9
This setting determines how many decimal places the calculator shows when computing answers. FLOAT denotes the maximum number of decimal places available. If we selected 2 for example, 10.4345 would be displayed as 10.43.
RADIAN / DEGREE
This setting determines how angles are interpreted for trigonometric functions. If you need to switch between radians and degrees on your TI-83 or TI-84, this is the place to toggle this setting. For example, if we want to evaluate the sin of 90 degrees, In RADIAN mode, we would enter sin(pi/2), which would give us the correct answer of 1, whereas in DEGREE mode, we must answer sin(90). Entering sin(90) in RADIAN mode or sin(pi/2) in degree mode will not give the intended result, so it is very important to know which mode you are in. These settings also determine how trigonometric functions are graphed.
FUNC / PAR / POL / SEQ
These settings denote the current graphing mode.
FUNC (function) plots functions in rectangular coordinates with Y as a function of X.
PAR (parametric) plots functions in rectangular coordinates where X and Y depend on a third variable, T.
POL (polar) plots functions in polar coordinates, where R (radius) is a function of theta (angle).
SEQ (sequence) can be used to plot sequences.
CONNECTED / DOT
This option toggles how graphs are displayed. The TI-83 Plus and TI-84 Plus graph functions just as a student might by hand, by looking at the value of a function at many different points and then connecting the dots. CONNECTED is the default mode and connects a line between points graphed on the calculator. DOT plots only specific points depending on what your calculator is set to choose. Typically CONNECTED is more useful, but in specific instances DOT can be helpful in solving problems.
SEQUENTIAL / SIMUL
This setting determines the order in which functions are graphed. SEQUENTIAL graphs functions one at a time. For example, in function graphing mode, your calculator will graph Y1, then Y2, and so forth. SIMUL (simultaneous) graphs all functions at the same time.
REAL / a+bi / re^θi
These settings determine the manner in which complex numbers (those involving the square root of a negative number, or i) are handled. In REAL mode, any answer involving the square root of a negative number will result in an error. In a+bi mode, results are displayed as a real part (a) plus an imaginary part (b) times i, the imaginary unit. In re^θi mode, complex numbers are displayed in polar form, which may be more useful for calculations and is commonly used in engineering and physics.
FULL / HORIZ / G-T
These settings determine how the graph screen is displayed. FULL is the default setting and lets the graph take up the entire screen. In HORIZ (horizontal) mode, the screen is split horizontally so that the graph occupies the upper half, whereas the rest of the screen can be used to enter equations or perform calculations. In G-T (graph-table) mode, the screen is split vertically so that the graph occupies the left half, and the corresponding table of values occupies the right half.
We hope you have found this tutorial on configuring your graphing settings on the TI-83 Plus and TI-84 Plus useful. Let us know what settings you prefer and why, or leave a message if you have any additional questions!

Pingback: Ti84plus settings | Groveplanet