While the TI-84 and TI-89 series are the most popular on the market, there are many other graphing calculators with advanced functionality. This guide, a Calcblog guest post by ime1729 (Matthew Lin), guides you through the basic setup of your calculator and learning to use RPN (reverse Polish notation).
Table of Contents
1. Introduction
So you decided to go ahead and buy yourself an HP 50g calculator. Maybe it was because it was on sale for $90 at Fry’s, your oddball engineer uncle got it for you, or you just decided to jump on the RPN trend. Unlike many of the calculators that you have used before, the HP 50g is significantly different and has a short but steep learning curve, which certainly pays off. As an experienced user of an HP 50g calculator, I will never want to look back at the TI series (except to play Tetris… maybe.)
2. Go back to the store!
The first thing you will notice from the HP 50g is that it uses a ARM processor and an SD card. The ARM processor is an older model, running at 203 MHz top and 75 MHz during a calculation.
2.1 Batteries
This calculator is a power hog! When I was using this calculator heavily for a calculus class, I would drain the batteries every week and a half or so. For the sake of the environment (and your wallet – the constant battery use will get pricey very fast), go and buy yourself a pack or two of AAA rechargeable batteries. Some good choices are either the Sanyo eneloops or the Amazon Basics (what I use). If you don’t have a charger, you can get one for under $20 – typically $15. It will pay for itself within a term of using your calculator regularly.
Also, if you are relying on this calculator, it is advised that you carry around a spare pair of batteries everywhere you go. The HP 50g isn’t very well protected, and it may turn on in your bag, draining your batteries. Since this (sadly) happens far too often for me to count, it is advised that you keep a set of backup batteries at all times.
Luckily, the calculator will run off of USB power. If you happen to have a dead calculator and have somebody to mooch a powered USB port off of, you can still use your calculator without straining your batteries.
2.2 SD card
There is an SD card slot at the bottom of your calculator that accepts up to 2 GB (There are 4 GB SD cards out there, but they are relatively rare.) A 2 GB card should cost no more than $10 and typically only $5-$7, and it provides effectively unlimited memory for your calculator. Note that you cannot run programs straight off the SD card, but despite that limitation, it is an invaluable resource and you should definitely buy a card if you are planning on using your calculator often.
All this being said, you can expect to spend an extra $15-$40 in accessories.
3. Getting acquainted with your calculator
3.1 The shift keys
There are three modifier keys on the HP 50g, and they are (fortunately) all located within easy reach – the ALPHA  , the left shift
  , and the right shift
  . Unlike the TI 89, each key has at least three functions assigned to it, so you get more control without having to dig through traditional full screen menus. 1
3.2 Turning the calculator in for the first time
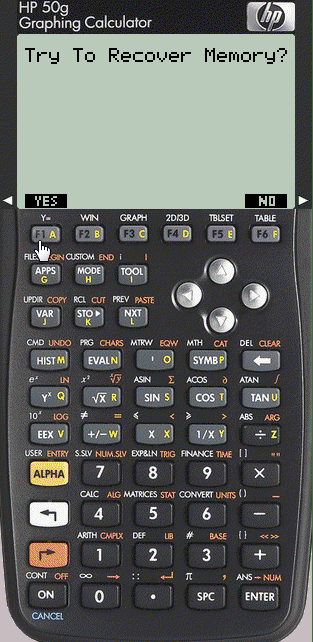
After putting in the batteries, press  to turn the calculator on for the first time. You will be greeted with the following screen, where you should press
  .
.

Afterwards, you will be greeted with this screen:

Note the bottom edge:

This is called the soft menu. Notice that each box in the soft menu has a corresponding button below it. For example, by pressing  you will send the command CLEAR. Many times, however, the menu is longer than the six
boxes displayed. In order to view the next six choices in the menu, press  . Doing this on the home screen changes the home menu to

In order to view the previous six choices that you just have seen 2, press 
 . Note that the soft menu can only display 5 digits of the name at a time, so if you want to see the full names inside the choose boxes, hold down
  and press
  . An example of what these would look like is this:

3.3 First calculations.
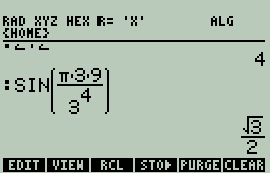
At the end of the day, this calculator is a calculator. Let’s try some basic calculations, such as 2+2 and sin(π*(3*9)/(34)). You can enter the first calculation with the key sequence 


The second expression would be a bit harder to input. The keystroke sequence is 


 . This is more or less what you would be doing on a TI calculator. The only difference is that you can only insert pairs of parentheses. In the case that you only want one parenthesis, insert a pair and remove the one that you do not want. To close a pair of parentheses, simply press
  .
.
Your screen should now look like this:

Let’s clear the screen, either by pressing 
 or
or 

4. Switching to RPN mode, and settings
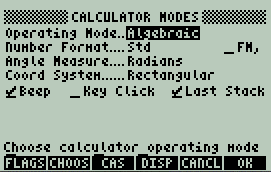
To enter into the settings page, press  . You will see the following screen:

4.1 Side note on RPN
The operating mode refers to whether you are inputting it in algebraic notation or RPN notation. Whether RPN or algebraic notation is better is probably the second oldest geek debate in history. Here are both sides of the debate:
4.1.1 Arguments for algebraic notation
- It is more natural to input (subjective)
- Most calculators use this notation
- You can input it as you see it from your scratchwork.
4.1.2 Arguments for RPN (reverse polish notation)
- Less prone to making errors (after becoming proficient)
- Fewer keystrokes
- No ambiguous expressions, such as -24
- No need for managing and balancing open-parens and close-parens.
- You can do a side calculation (this is no longer relevant on the TI-Nspire) without having to stop mid-input
- You see the intermediate results, and potentially notice if something goes wrong relatively quickly.
4.2 Switching to RPN
Using the arrow keys to navigate to “Algebraic” and press  (CHOOS). Select RPN, and press OK (
 ).
).
4.3 The selections in the calculator modes
| Field | Description |
| Operating Mode | Choose between using your calculator in Algebraic mode or RPN mode. |
| Number Format | Choose between standard notation, scientific notation, and engineering notation. Note that the decimal point will not appear unless if you are dealing with approximate values. |
| FM, | In some places of the world, the decimal point is replaced by a comma. If you use a decimal point in the place of a comma, check this box by pressing  . Otherwise, leave it unchecked. . Otherwise, leave it unchecked. |
| Angle measure | Choose how you want to measure your angles – degrees, radians, or grads. |
| Coordinate System | Choose between using rectangular 3D coordinates, polar cylindrical coordinates, or spherical coordinates. Coordinate points and vectors on the stack will automatically be converted. |
| Beep | Every time there is an input error, the calculator will accompany the error message with a beep. If you are using the calculator during a test or in a quiet place, turn it off. |
| Key click | Every time that you press a key, a high pitched noise will be given as feedback, which may come useful (presumably) if you are wearing gloves while using your calculator. |
| Last stack | Keep this on; it lets you undo your work. |
4.4 A couple of flags to change
Some of the more advanced settings on HP calculators are done by switching flags. We recommend switching the following flags:
| 60 | The key  locks Alphanumeric characters (flag on) vs locks Alphanumeric characters (flag on) vs   locks Alphanumeric character (flag off). It is highly subjective, but since you can access the number pad and do not need to access the function layer (white print) actively while, it would typically save you time. |
| 116 | This is also entirely subjective; whether you want trigonometric simplification to prefer simplifying to cosine or sine. |
| 117 | Soft menu vs choose boxes. Choose boxes typically disrupt your workflow and are relatively clunky to use, so toggle the flag on and use soft menus instead. Note that certain features, especially the STAT menu, are only available as choose boxes. |
5. Learning RPN
The first thing you should notice is that the home screen looks significantly different now.

The main (or only) difference is that instead of the calculator displaying your previous calculations, you are instead greeted with a stack. The stack has many uses, depending on how you want to use it. It is used as a history archive for past calculation results, previous versions of a program that you may be making, or a workspace for a calculation. A large stack, however, may quickly slow down your calculator, so it is recommended to keep the stack clean.
5.1 How RPN works
Instead of functions taking in arguments, as in algebraic mode, calculations are performed by taking a number of elements off of the stack, and then returning values back onto the stack. You can manipulate the stack either by calling functions, or by entering values. Once you remove an element from the stack, all of the elements above it will drop down one, and once you insert an element into the stack, all the elements above it will pop up by one. Once you get used to it, the concept of stack manipulation will come naturally.
The numbers on the left are the stack levels. The first level is level 1, the second level is level 2, and so forth.
5.2 Your first calculation: 2+2
Try pressing 
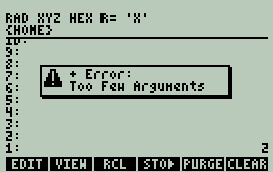
 . You’ll hear an unpleasant beep, and then an error message:

‘Too few arguments’ means that the function requires more arguments than how many items you have on the stack. The addition function takes two values from the stack and returns the sum as one value. Press  to dismiss the message, and then enter the second ‘2’ into the stack, then add them together. This is somewhat like setting up a vertical equation in elementary school, where you wrote down the two numbers, drew the line, and then put the plus sign. All told, the key sequence is


 or
or 


 .
.
You may have noticed that the second enter was optional. When you use a function when you have something typed in, the calculator will first take the value(s) that you have typed in, put them into the stack or evaluate them, and then finally call the function that you have keyed in. The separator on the HP 50g is a blank space, so 2+2 could also be entered as 


 . Note that this is not the preferred way of performing a calculation unless if there are special circumstances.
5.3 What parentheses? SIN((π*3*9)/(34))
You probably have noticed that parentheses are hard to reach on the HP50g. That’s because you rarely ever use them. Nor will you have to remember order of operations because these are non-issues on an RPN calculator. RPN essentially works by taking calculations and then breaking them down step by step, giving you full control and a good view of intermediate values. In the calculation above, we see that the two smaller equations are (π*3*9) and (34). Let’s first calculate (π*3*9), where pi can be inserted into the stack by pressing 
 . You should get 27π as your answer. Now, let’s calculate 34, where the exponent function takes in two numbers and returns you the power of the value on level 2 to the value on level 1. Now, we have the two values of the two sub equations, and we press the divide key to divide the second level by the first level, and then hit the sine key to take the sine of that. If you have been paying attention, you would have noticed that I gave you a long winded way of taking the sine of π/3. All being said, the keystroke sequence is


 .
.
There is much more you can do with your HP 50g, and this tutorial has hopefully served as a useful introduction to your calculator’s basic features and to using RPN. Have fun!

One Response to Getting Started with the HP 50g